Robert Shenton
Programmer, writer, game developer
Programmer, writer, game developer
"Ask me what 9 x F is... It's Fleventy Five"
~ Erlich Bachmann
So I kinda promised in my first blog post that I would write up a little piece about how I put this site together. So this is that piece. Promise fulfilled!
The time had come for me to revamp my site and I needed something that was simple for me to update without the clunky overhead of a CMS. After all, I am a programmer and probably more comfortable with a command line than some over-engineered GUI anyway. I decided a static site generator hosted on GitHub Pages was the way to go.
I had used Eleventy a few months earlier when I had worked on a friend's site and had had some success with it, so picked this as my weapon on choice.
Static site generators are quite popular and have been around for a little while now, so a lot of you reading this might be well acquainted with them. This post is meant for the frontend developer who isn't and is mostly an attempt to convince them why they should be, as well as documenting some of the things I learnt in putting this humble little site together.
Okay, here we go!
I was about to create an empty project when I noticed in the Eleventy docs a page called Starter Projects. There I found a handy list of ready-to-go Eleventy projects with pre-made templates. I perused the list and found one I liked - Skeleventy. Simple layout, sleek typography and an attractive colour scheme - it's exactly what I needed. In fact, you will still see a lot of similarities between my site and the demo page - Skeleventy's visual aesthetic was already largely in the direction I was hoping to go, saving me hours of painstaking design work!
Still, a fair bit of the template had to be adjusted to fit my liking, but that starter project which gave me a massive leg-up and I was super pleased to have found it. I cloned the project and got to work.
The first thing I did was remove all the unnecessary junk I didn't need like the header and footer. The second thing I did was add the sidebar that you see on every page. This is where the power of a templating engine really starts to shine. I only had to write the code once and then include it on every page like so:
{% include "components/sidebar.njk" %}
When the static site files are generated, the sidebar component is injected into each page by the templating engine. That means any future changes to the sidebar would only need to be made in one place. Handy!
The only other major change I made was to the colour scheme, swapping out Skeleventy's pink for a nice shade of teal. Like I said - hours saved!
I'll be honest, when my site was just static HTML files, adding content wasn't all that fun. It mostly involved hunting down the relevant lines of HTML, copying them and changing the appropriate values. That has all changed with Eleventy and the templating engine, however. Adding content is as simple as adding a new file, which is a lot easier to manage. Every blog post on this site is just a Markdown file in a folder.
My folder structure might look something like this:
blog
 ├ first-post.md
 ├ second-post.md
 └ third-post.md
And at the top of each file I define a little meta info about the post like this:
---
title: "How I built this site"
date: 2020-01-26
featured_image: /images/blog/code2.jpeg
image_caption: (not my actual code)
tags:
  - blog
  - site
  - programming
---
The rest of the file contains the blog post's contents written in Markdown. Take a look at this post's file to see what I mean.
The templating engine does the rest. An individual blog post is generated, injecting the blog meta info and contents into the blog layout template. The URL for the post is simply the file name, so something like blog/first-post. But we still need some way to link visitors to our posts. That's where collections come in.
This post is marked with the blog tag, so the templating engine adds it to a blog collection. Then on the homepage I simply loop through that collection and create a link to each post.
<ol>
  {% for post in collections.blog %}
    <li class="mb-1"><a href="{{ post.url }}">{{ post.data.date + ' - ' + post.data.title }}</a></li>
  {% endfor %}
</ol>
It's really as simple as that.
Over the years I had seen that GitHub had started hosting static content for free. This was great, because it meant I could serve my site to visitors right from my repo! Any code changes I push are automatically deployed! Very convenient.
Just go over to the settings of your repo and look for the GitHub Pages section. There you can choose which branch to build from.
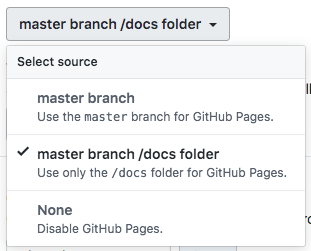
Because my source files are in the root, and I don't want to be serving that, I opted to generate my static HTML in a docs folder on the master branch and serve that. In my package.json file I simply added the docs folder as an output option to my production build script, like so:
eleventy --config=eleventy.config.js --output=docs
Finally, I wrote a little bash script to run the 4 commands it takes to actually push a deploy up to the cloud.
npm run production
git add .
git commit -m "Deploy"
git push
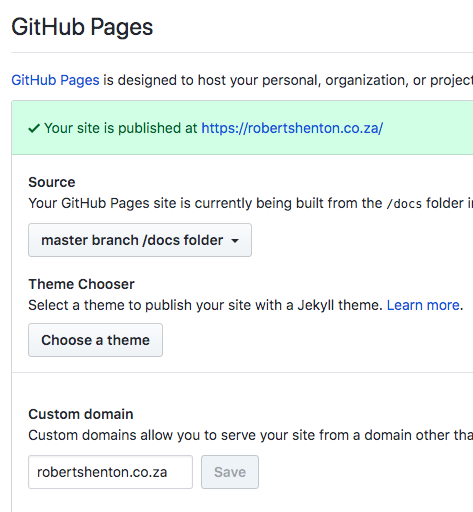
Now whenever I'm ready to push an update I just run that script and GitHub does the rest. But there was one final step - linking my domain. And this was probably the hardest part to get right. I entered my custom domain name in the setting section (you will find that GitHub automatically commits a CNAME file to your repo when you do), but soon found that this wasn't enough. Poring through the GitHub docs, I realised that I needed to configure my domain properly as well.
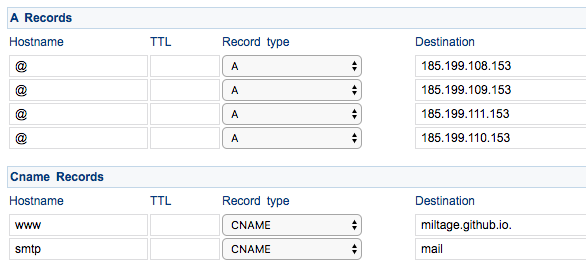
I added the A records as instructed, but my domain still wouldn't work. I took to Twitter but found no help there. Eventually I found a blog post somewhere where someone stated that they had had to add a CNAME record of their GitHub subdomain as well. I tried that, and it worked!
Here's what my domain records looked like in the end. (Notice the period after my GitHub subdomain, apparently that's important.)
Finally, everything was set up and working correctly!
That's about the long and the short of it. I am really only scratching the surface of what templating engines can do though, I advise you to check the Eleventy docs for more information about all the things you could do with it.